Level 3 Games Development
By Eoin Matthews
UNIT 6 Investigating Visual Media
Unit 5-6 Investigating Audio & Visual Production and Technology
Here is the assignment for unit 5 and 6, I have been tasked with creating an animated mission brief at 15 seconds minimum, showing an alien that I have created using Mudbox and giving the player an objective to seek and capture this alien. Along with creating the visuals for the project I will be producing the audio required from Foley which is a method of recording sound effects for use in media and by using pre-made audio libraries to bring the project together. With this, I will be creating concepts, mind maps and experimental examples of aliens created with Mudbox so show my progress and ideas towards this task.
Context
Ruiner

Steamcdn-a.akamaihd.net. (2018). [online] Available at: https://steamcdn-a.akamaihd.net/steam/apps/464060/ss_91306699cea73c09665ef53217e7351fbbb95bd1.jpg?t=1539188441 [Accessed 12 Nov. 2018].
Starting with the lighting within the scene, there are many bright neon lights with an increased amount of bloom lighting up the area with a security drone illuminating an NPC with a spotlight. Along with this, all the colours within the image are a mixture of dark greys for the environment with cold blues and warm oranges lighting up building interiors and spilling out into the street. Next is the overall setting of the image, it's based within an urban cityscape possibly in an oriental district as there is Chinese graffiti on the walls and floor, the overall vibe of the image is techno-noir, a city with technology in every aspect with a gritty almost mysterious tone to it. Looking at the image some more I can see all the different props used within the scene such as the rubbish scattered on the floor, particularly around the bins as this is where you would generally see it in real life. Other props you can see in the scene are a couple of benches with NPC’s sat at them one of which is talking, possibly commenting on the story. Another prominent prop featured are the many pipes and power lines crossing each other on rooftops and above the street.
As for how the world is presented through the way its NPC’s are dressed and styled, you can see its influenced by a futuristic urban street fashion with some cultural hints too. The style also may have something to do with the social influence of these NPC’s and where they stand in this world, wearing items of clothing such as tank tops, vests, leather jackets, shortcut dresses and puffy coats all whilst keeping it casual this is also complimented with the hairstyles accompanying these outfits , most of the NPC’s located in the scene have a mohawk haircut with the female NPC’s having a shortcut suited to them with the exception of being an NPC wearing what looks to be a hard hat. Looking at what is currently happening in this scene there is a security drone interacting with an NPC in the centre of the image, to the left of that is a couple of NPC’s sat on some benches chatting, we know this as there is a chat box above them, Above the characters, talking on the bench is an NPC leaning against a window, this NPC could possibly be following the player character whom is dressed in a black jacket.
The way the image makes you feel is a sense of unknowing and how dark and gritty the scene is, this is shown as there are many dark corners, edges and shadows mixed with the bright bloomy neon lights placed around the scene with light up the scene with contrasting blues and oranges with this, I have used a colour palette generator to find the key colours used within this images as you can see above. With the multiple NPC’s being scattered around give a crowded feel to the image life and makes the scene more believable in its setting.
As this is a part of the game where there is no combat there is no Hud and only a chat box for the NPC’s who are chatting. The game is a 3D isometric styled shooter and slasher with a fixed camera angle, although you can only see the camera perspective in this image, the combat mechanics are not although you can see it in any additional promotional content provided. With how the image is rendered, the styling is close to a cell shaded comic book where you can see a slight outline around NPC’s and some of the environment as with the colours chosen for their respective assets such as lots of neutral greys and vibrant yellows.
With the narrative of the image, it tells you that this city is a dangerous place hinting at trouble around every corner, whilst there are plentiful NPC’s located around the scene, there are also villains ready and waiting for the player to make the wrong move. The hero of the scene can be seen walking out of a building which looks to be a nightclub with a possible bouncer outside waiting for trouble.

Fallout: A Post Nuclear Role Playing Game

Steamcdn-a.akamaihd.net. (2018). [online] Available at: https://steamcdn-a.akamaihd.net/steam/apps/38400/ss_87e2a0835387d9a01b1dbcd51f5baa68bc95fe1b.jpg?t=1506722635 [Accessed 12 Nov. 2018].
The lighting used within this scene is a frontward facing and slightly angled towards the interface, with the character model being lit at a different angle, as the interface is designed to be viewed as a computer with the NPC being displayed on the monitor, this, along with the tube lights to the side of the image bring some light to that corner illuminating the insides of the computer.
As for the colours used, there is a range of greens used along with rusted browns and blacks with the screens having a clean matte grey so not to interrupt the text displayed. Some other noticeable points are the Review, Barter and Tell Me About buttons, the Review button uses a striped yellow and black used to remind the player that they can view their conversation, the barter and tell me about buttons are more straightforward by having a small red button on a grey plate. I have included a palette of the most used colours below.
With the setting of this game, its design is an apocalyptic wasteland with mostly dry deserts and little to no life as shown in the display above the text where you can see an NPC that the player is interacting with. As mentioned, the main element of this scene is the computer interface in with the player uses to interact with other characters within this game, the screen above is used to display an NPC and the screen just below is used to display the conversation between the two and the final screen located below is the dialogue screen which displays multiple dialogue options. Additionally, where the top display is the internals of the computer are showing as if the front of the computer has been ripped off.

The props you can see within this scene are very limited as it’s an enclosed space, one prop that draws your attention are the tube lights to the left of the image, as these are emitting light, they illuminate what looks to be a diagram of sorts. Other noteworthy props to include are the various wires weaving around components and “connecting” parts together such as the speaker and screen in which the NPC is being displayed on.

As much of the NPC that you can see is limited, but from what is visible you can make out that they're wearing ragged clothes that are yet, still somewhat presentable being that it’s the apocalypse and dry-cleaning isn't readily available or be it that it is a sign of poverty within their town. Another point of reference to the NPC that could possibly mean something is the earring on their right ear which could be a sign of importance or merely an aesthetic choice made by the developer during development. Continuing with the detailing of the NPC you can see that they are old and wrinkled with a short haircut, this is presumably because they are of a simple native background adjusting to the wastelands harshness.
With the inclusion of a conversation within this image, you can see this is the first time the player has met this NPC, as the options the player must respond with, go from telling the NPC what their quest is or to lie about who and where they are from, as this isn't the full dialogue of this NPC just from the introduction you can tell that they are cautious of the player using the phrase “Tough times tan the human hide”. The player has multiple options to reply with all branching out into either gaining information to do with a quest, to a dead-end conversation depending on what to player responds with.

Watch Dogs

360, W. (2014). Watch Dogs Review on Xbox 360. [online] Wpxbox. Available at: https://www.wpxbox.com/watch-dogs-review-xbox-360/ [Accessed 11 Jan. 2019].
Much of the lighting within this scene is natural lighting from the sun, you can see the tree in the background casting shadows from the direction of the light. Other light sources in this scene are the wall lights on the buildings lighting up shop entrances to help them stand out from their surroundings.
The colours mostly present within this scene are warm grey scales which comes from the buildings making them feel plain and run down giving a very urban feel, which is an important part of this game as this is its main setting. This scene also features Sienna/orange tones within the trees and foliage which gives you context to the time of year which is Autumn as the trees are losing their leaves which you can see on the ground. Finally, the last colour which is present within this scene is the medium turquoise, this is an artificial feature which is coming from the protagonists’ phone, having this complementary colour gives a contrast to the scene which stands out as this is an important prop within this game.

The setting of this scene is on a high street located in a downtown area, this area in general looks run down and neglected with graffiti tags along the walls and a homeless person sat beside a store. Also present is a large amount of litter which suggests that the local authority is no longer wanting to monitor and take action on the area from ongoing crime and neglect. To the upper left of the scene, you can see a railway used as public transport which implies that this is a busy populated area just like in real life Chicago where this game is loosely based upon. The character in the foreground is the games main protagonist who is a hacker hence the text overlaid on the screen saying “bank account hacked” with some other information such as the targets details of who they are and what they do.
Props that are present within this scene such as the mobile phone are key to the plot of this game as technology has a heavy presence as the privacy and safety of the citizens are being made vulnerable. The target within this scene has two briefcases suggesting that they are a person of importance within a business which is confirmed by the protagonists’ phone as they are being hacked. Other props such as the ATM in the distance suggest that it is located within a retail space and that can be hacked which is suggested by the faint white line pointing to it.
There are three main costumes which reflect an individual’s social status and wealth, from being struck with poverty all the way to comfortable living. These statuses are shown in the homeless person's attire which features worn baggy clothing and a cardboard sign with the person in the orange jacket offering them something, this person has dressed appropriately for the cold weather in recently clean clothing. Whereas the businessman on the phone is wearing a smart business suit implying his wealth and higher social status. Our protagonist fits more into the middle class as their clothes are not as worn which helps him to blend in more with a crowd which is needed for his profession.
There is not much hair and makeup within this scene as the protagonist is facing away from the lens and is wearing a hat to hide their face, the only other faces that are clear to see are the businessman who has a clean shaven head and clear skin, whereas the homeless person has a worn and dirty face with a cap covering his head for warmth.
There are three main actions taking place within this scene with a fourth action taking place in the background which has no significance to the scene other than to fill in space and to suggest a hacking element to the scene. The main action taking place within this scene is the businessman being hacked and as he has had to stop to answer his phone, he has dropped his briefcases and has come to a standstill allowing the protagonist to target him. The other action taking place is the person in the orange jacket offering the homeless person some kind of item most likely food or money. The final action is the protagonist using their phone which is the main focus of this scene and mentioned before it is the main plot point for this game.
The composition of this scene is laid out as such so that the main focal point is the protagonists’ phone which is similar to a left-sided golden ration as shown here.

With these elements laid out as such, you can see where the artist wanted your eyes to go in order to tell a story from the image.
Psychology Of Sound


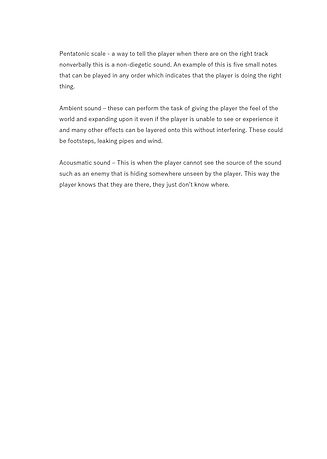
Sound in Games Experiment
By using the website Bandlab I was able to create an audio track for this footage of a game intro, as this game looks futuristic I decided to use a lot of synthetic instruments with added effects. As you can see in the pictures to the right, all of the tracks are arranged into a composition to fit the surroundings of the video. Such as a train on the tracks and a talking crowd.


Koenig, M. (2019). Shopping Mall Ambiance Sounds | Effects | Sound Bites | Sound Clips from SoundBible.com. [online] Soundbible.com. Available at: http://soundbible.com/1265-Shopping-Mall-Ambiance.html [Accessed 11 Jan. 2019].
Koenig, M. (2019). Cargo Train Sounds | Effects | Sound Bites | Sound Clips from SoundBible.com. [online] Soundbible.com. Available at: http://soundbible.com/1874-Cargo-Train.html [Accessed 11 Jan. 2019].
Research

Phase 1

Phase 2

Phase 3
YouTube. (2018). Mass Effect 2: Loading Screens. [online] Available at: https://www.youtube.com/watch?v=2bbRxNT-5EI [Accessed 14 Nov. 2018].


Static.gamespot.com. (2019). [online] Available at: https://static.gamespot.com/uploads/scale_super/416/4161502/2349078-deus+ex+-+deus+ex+-+2013-10-19+06-54-2159.jpg [Accessed 9 Jan. 2019].
DeviantArt. (2019). Exler OS Login screen etc.. [online] Available at: https://www.deviantart.com/garroh/art/Exler-OS-Login-screen-etc-280762963 [Accessed 9 Jan. 2019].
Vignette.wikia.nocookie.net. (2019). [online] Available at: https://vignette.wikia.nocookie.net/deusex/images/3/39/DXHR_computer.png/revision/latest?cb=20150704134510&path-prefix=en [Accessed 9 Jan. 2019].
YouTube. (2019). Deus Ex: Human Revolution - Terminal Hacking Gameplay (PC, PS3, Xbox 360). [online] Available at: https://www.youtube.com/watch?v=1-bR-uscIKE&t=6s&index=2&list=LLBAWId0U0R6T7EdeBKJAAwA [Accessed 9 Jan. 2019].


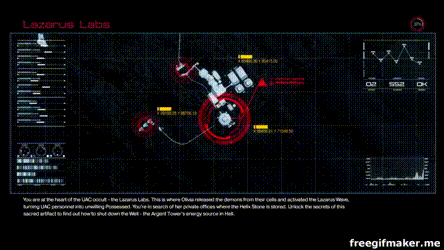
YouTube. (2019). Doom 2016 - Lazarus Labs: Pre Mission Text / Map Loading Screen ''Heart of UAC Occult'' Sequence PS4. [online] Available at: https://www.youtube.com/watch?v=-cYHPyTUiKc [Accessed 10 Jan. 2019].
Practical Skills
Lesson 1 - Dancers
After using Adobe After Effects I was able to produce this short video with the assets given to me. In order to produce these results, I imported the correct format of footage and the photoshop file into AE, in which I experimented with the compositions and applied different effects to the composition. Effects such as exposure, blur and text and customising how it transitions onto the composition using the Zoom Bubble tool. Once done I wanted to make the text appear slower by right-clicking on the keyframe and choosing the Easy Ease In option in the Keyframe Assistant menu. When finished I rendered the composition and uploaded it to YouTube.
Lesson 2 - Dj
I imported the footage into AE and created a new composition, afterwards I added a shape layer using the Rectangle tool then applied a gradient fill to it and modified it to fit the composition better. Once done with the background layer I went on to create a custom shape using the polygon tool when creating the shape, I modified its properties to give it a twisted look, afterwards, I repeated the shape using the repeater tool in the Add pop-up menu. When I was happy with where the custom shapes were in my composition, I made them rotate in the background using the Transform tool, by pressing the Home key to position the play head at the start of my timeline and doing the same again by pressing the End key to place it at the end of my timeline.
Lesson 3 - Sunrise
In the third lesson learning about after effects I created this short 10-second clip showing a timelapse of a windowsill, with an animated clock giving the illusion of time moving fast. Along with the clock I also created the moving shadows under the objects in the clip to simulate a sun moving, with the sun I added a lens flare effect to make it so that the sun was shining through the window after I was done making sure the sun and shadows in the clip looked good I added some birds that move across the window with some blurring so they would look like they were moving quickly. Once finished with this project I rendered it and exported it to YouTube where I placed it on this Wix page.
Lesson 4 - Avebury Stones
For the fourth lesson, I started with a 2D image which was already created with the hills, sky and stones pre-cut out this was done so that I could make the scene 3D with the camera moving past the stones. Firstly I skewed the ground to give it an angle and being careful not to make it distorted which would ruin the sense of moving around the scene, then I went on to layer the scene adding the hills to the back of it and angling them so they would seem at a distance to the camera along with the sky which I placed at the back of the scene behind the ground, stones and hill. Finally, I added in the stones, positioning them at different angles and heights so that when the camera moved towards them they wouldn't appear as 2D but rather 3D. After placing the stones I made the camera pan towards them using the position tool and added the points on the timeline for when and where I wanted it to move. As with the lessons before I rendered the clip and uploaded it to YouTube and added it to my Wix page.

Alien Character Concepts and Moodboards


The images above show my inspirations towards creating various character concepts, I used these images in particular as they are based in space and are classed as an alien within their respective shows also because I like them and the way they are drawn and the general style of the first two sets of photos is the style I wish to try and recreate in my own images as you can see below. The exception is the third set of images which has a different art style altogether, but with this, if I am unable to create concepts in the first style then I will be trying this one instead as it has simple shapes and tones to it.
Below I have drawn two separate characters and tried to incorporate them into one using my imagination on how they might look to the best of my abilities. Then I went on to create four different angles of view on the finished character to get a sense of what they will look like viewed at different angles. Finally, I quickly sketched up a character from the final set of images, I am very happy with how this turned out as I was able to almost recreate the character with little mistakes.


After receiving feedback on these sketches I have decided to try and create a more alien looking creature to be used for my project as you can see below, I have added additional context to the newer sketches with the source images for comparison.
Alien Character Mood Board
Alien Character Mind map


Here are my character mindmap and mood board ideas and concepts, as you can see from the mood board a lot of the overall tones and themes have been combined into my alien concept along with the some of the ideas from the mindmap such as the headgear and some personality traits like being a hacker and a smuggler which is reflected in this piece.
Final Concept sketch

Final Concept coloured

Mudbox Experiments and Concepts
Experiment 1 - Goblin


With the start of this new unit comes with new software for me to wrap my head around. Mudbox, a 3D sculpting software used to create digital models as if they were clay, ranging from objects to characters. To begin with, I started with a basic sphere from there I began to sculpt and manipulate it using a multitude of tools that Mudbox provides such as the sculpt tool which adds more "clay" to the model enabling me to create the ears, eyes and nose to my first model. Other tools I used in the creation of this model are the knife, smooth and smear, I used the knife tool to cut into the model in order to create ridges on the skin and to give more facial expression to said model along with the smooth tool to blend the ridges into the face. The final tool I used most was the smear tool which I used to better shape the model and to add distinct blemishes when sculpting at a higher poly count.
As you can see from the headshots above, my first attempt isn't anything like my concepts further up but with this, I was able to better understand how to use the software which will be reflected more in my future designs and concepts.
Experiment 2 - Bell Pepper

Pexels.com. (2018). Yellow Bellpepper · Free Stock Photo. [online] Available at: https://www.pexels.com/photo/healthy-vegetables-agriculture-vegetarian-68195/ [Accessed 12 Nov. 2018].
The second experiment using Mudbox was to try and create a pepper from a written tutorial. As you can see from the images below I was close to creating a bell pepper although I feel like so far that sculpting using Mudbox is not really for me as I struggle to really understand the angles in which the brushes work and how the brushes work with different pressures applied to them. I will still work towards creating better and more detail models within Mudbox, but as for now, I prefer using 3DSMax as I like to be able to manipulate my models precisely from points instead of clay.


Mudbox Alien Head Concepts


Following up on the mudbox experiments, I was then tasked with creating a generic head shape to project some different alien concepts over this, as you can see above I created five different concepts, one of which I will be continuing to use further on in this project.
Thumbnail Sketches


Here are my character thumbnail sketches that I have created to give myself an idea of what different kinds of alien characters I could go on to develop further. Using this technique of spending 10 to 15 minutes to roughly design some basic characters I was able to experiment with different ideas regarding my overall design choices and whether or not to continue with particular ideas. An example of this would be character 5, whos overall style is too basic and cartoonish so with that, I decided to try and create more interesting characters with more features and a wider range of shapes as I progressed in my concepts. My favourite concepts so far are numbers 7, 14 and 9 as these were some of my more detailed and interesting designs.
Graphics Tablet introduction
Alien head
Pinstripe


After being introduced to the use of a graphics tablet, which at first was strange as I had no other previous experience using one and adapting to looking at a screen whilst drawing on the tablet was odd. To practise using a graphics tablet I was tasked with creating a pinstripe design, to better understand how different pressures and brushes work and what other tools that I can use to implement different designs into my project. After creating a gnarly pinstripe design I move onto the basic alien model that I had created in Mudbox and sketched over it to create new angles and shapes on this model giving it more features and details. The overall production of these two projects was interesting as I really enjoyed using a graphics tablet to create more detailed and cleaner art as I was not confident in my art skills beforehand. Along with these projects, I experimented some more by tracing and painting a character from a Tv show as you can see below with an additional character from my thumbnail concepts colourised, by working on these two additional pieces I was able to better control my hand when drawing.


Texturing Examples
Here is a collection of various shading and texturing techniques and styles that could be incorporated into my final Alien character. In example 1, I experimented with different levels of shading to better understand what types of pressure to apply when creating different textures which you can see in this example. In example 2, I tried to replicate multiple textures in various styles with the use of a fine liner pen, paying attention to not duplicate any designs. The ones I think are best are Stippling and contour Hatching. Finally, in example 3, I chose 2 textures from the previous example and was able to represent them as 3D objects with different levels of lighting, then I created 2 of my own designs with an organic look, to better understand how this can be translated into 3D modelling software.

Example 3

Example 1

Example 2
Mudbox Texturing and Alien Turnaround
Here is a short clip showing the techniques and methods I used for my final alien bust. As you can see in the video by using select stencils and combining them with the airbrush and paintbrush I was able to give my character some textured details such as scuff marks and dirt on their headgear and skin, with these I was able to give my character more definition and tone to their overall look.
In this second clip is my finished alien character bust that is animated so you can see a full 360 of the final design. In order to create the full spin of the character, first I imported the file into 3DSMax as an FBX file, then by using the toggle auto key mode I then moved the time slider to the furthest point to the right and rotated the bust 360 degrees. Once I was done with that I pressed play animation button just to confirm that everything moved correctly, then I just had to disable the inertia on the model so that it could be easily repeated with no noticeable acceleration, I did this by selecting the curve editor graph and setting the set tangents to linear option which made the curve straight as you can see here.

Before setting tangents to linear

After setting tangents to linear
After this, I rendered the newly animated bust using 3DSMax's render setup and changing the time output parameters to render the active time segment 0 to 100 with the correct area render and output size, not to forget to disable grids in 3DSMax so that they don't show up in the final product.
Here is an annotated video describing my process when creating this model.
Animation Storyboarding
By using the video below I was able to better understand how storyboarding works and also what methods are used to portray camera movements within a scene, along with this I also travelled to the Warner Brothers Studios to learn more about these processes.
YouTube. (2019). Tales from the Borderlands Episode 2 Opening Credits. [online] Available at: https://www.youtube.com/watch?v=gkSBmi2HU_Y [Accessed 11 Jan. 2019].


With these techniques and methods, I applied them to my own work process when creating my animation. I used page numbering to make sure that my storyboard was in order and I also used different movement keys to direct props across my scene using a variety of different arrows to indicate movement.

Final Animation
Here is my final finished animation, I have included any tutorials that I have used to add any extra effects to my project.
In this second tutorial, I used the method of creating scanlines and included some colour correction to my animation.
In this first tutorial video, I used the randomised text to create simulated numbers within my animation.
In this tutorial, I used the method of creating an animation of a TV turning on and off.
Unit 5 & 6 Evaluation
Audio
When producing the audio track for this project I used multiple types of instruments and one keyboard in order to achieve the notes for my work by trial and error when selecting the right notes. By recording the sound of my keyboard, I was able to create an intro into my animation with the sound of keys clicking, I used a couple of synth instruments to better capture the artificial sounds matching the genre for this project by using a website called Bandlab. For my research into this assignment, I used Spotify to find similar sounding audio tracks that suited this genre of futuristic sci-fi, one playlist, in particular, was the Prey Original Soundtrack which I drew some inspiration from as the setting of that game is similar to that of the assignments. Another method of research I used was finding other games within this genre and watching their mission briefing screens and analysing their audio to use in this project.
When experimenting with the audio in my sound in games experiment as the environment within that scene was fast paced I chose to use a faster BPM of 220 to better match the speed of the clip shown, as my animation was a few seconds longer than that video I wanted my audio to be slower as when creating my animations, I wanted them to flow within my project, so I set the BPM to 100. The issues I faced when creating the audio for this project was my inexperience of using the Bandlab platform to produce tracks along with learning the different keys for my notes as I wanted a repeatable beat that didn’t sound out of place within my scene.


Visual work
In order to create the graphical elements of my animation, I started by researching into what kind of themes and visual keys I wanted to be included within my project. This involved analysing several different game images, their context and what can be taken as inspiration towards my project. Once I had decided on what direction I wanted this project to go, I then started to create character mood boards with key design elements that would be implemented into my final character design. Along with these mood boards, I created multiple character thumbnails to experiment and expand upon with these ideas on what my character would look like, during this time I was also learning how to use a graphics tablet as I had not used one previously. Other techniques such as texturing, shading and learning how much pressure to use when putting pencil to paper proved useful as with these styles I was able to better understand how to create more detailed concepts towards the project.
Problems that I faced when producing the visual concepts towards this assignment was trying to find a style that I could replicate with my skills and being able to have a more focused approach to what that style may be, as my first attempt at finding inspiration towards a character design didn’t match the genre or theme of this project. However, once I had re-evaluated my original sketches from the feedback I had received, I decided to head in a more mysterious bounty hunter/smuggler approach for my final character design as these profiles resonated better with my ideas for this project. An area of development that I wish to further my skill in, is my ability to create more detailed hand-drawn sketches in my sketchbook and to include more colours in my sketches. One thing that I would do differently if given the chance would be to practice drawing a new character sketch every day with a time limit, as to better my skill for this process to produce higher quality art and concepts.
Production
As I started the production of my character, so began my process of learning how to sculpt in 3D using a 3D Sculpting software called Mudbox. As you can see in my Mudbox Experiments and Concepts segment of this unit, in my first experiment I created a Goblin using these tools so that I could better understand how they work and what methods I could use to manipulate the virtual clay. With what I had learnt from this, I started to experiment within Mudbox to create my character using the various tools now at my disposal, one tool, in particular, that proved useful when creating my model was the Wax tool which enabled the ability to layer on the virtual clay at various levels of depth and strength. Other tools such as Pinch and grab also allowed the manipulation of the various areas of my character to be more in line as to what my concept of the character was, such as the sharp angles on the characters headpiece being made with the pinch tool and the characters hair is a mixture of both of the pinch and grab tools used in conjunction with the freeze tool as not to disturb other parts of my model.
Once I was pleased with the outcome of my character model I then went on to paint the model using the paint tools within Mudbox, I used the airbrush tool and the dry brush tool to add blending and scuff marks to my characters appearance along with the use of stencils to give my character a more textured image as I wanted my character to appear worn. Referring to my Mudbox texturing and alien turnaround segment in this unit, in order to animate my character I exported the model as an FBX file to be then imported into 3DSMax, by doing this I was able to animate my character using the autokey mode in 3DSMax to create a 360 degree animation whilst also making sure that the animation was smooth by disabling the inertia created by 3DSMax, I chose to animate my character in this way as I was not able to create a full body rendition of my character in the time given, which is something I would like to create later on in future projects as I wish to animate my character performing multiple actions.
With my character animation in place, I moved onto the storyboard element of my animation which involved drawing out the multiple frames required for this animation, timed by five seconds for each frame. I did this to allow some room for any extra elements that I would add later. As my research I concluded earlier in my assignment had some elements that I wanted in my animation, I chose to sketch them into my storyboard to be later implemented as you can see from my final project. Some examples of these elements that I recreated within my own work are the grid lines in the background of my animation which my research on title Doom inspired me to create along with the red circle highlighting features of my character, another element that inspired me was the random text in the Mass Effect 2 loading screen as I wanted the appearance of information that gave the scene more energy.
Post-Production
With all of my production components complete I started working on my animation using After Effects to compile my work into a functioning animation. During this time I looked back on my previous work with After Effects in order to understand where key tools were and how to use them, combined with the use of a few select video tutorials from Video Co-pilot and Creative Cow which I have included below my final project, I was able to create and transform what I had created during the storyboarding segment of this assignment to the best of my abilities. As I had a base animation to start off with from previous sessions in class I was able to adapt it into its current iteration by experimenting with different effects and styles within After Effects, but as you can see some of these original elements still remain as altered versions of themselves. For example, the circles surrounding my character have changed drastically from their original animations to the ones you can see today, another example is the text box changing its shape with the additional text being added as its original design was basic with no alterations to its form.
However, I did experience a few issues when creating my final animation in regards to its style and a small error with the circles glitching out as the animation ran to an end. With the style of the animation I wanted it to look and feel like an old sci-fi monitor with the original ratios included, but unfortunately due to already creating a majority of my animation in the standard ratio of 16:9 I was unable to achieve the effect of a 4:3 ratio, aside from the ratio I was, however, able to create the same visual styles associated with old Tv’s and monitors with scanlines which I think turned out really good with the help from the previously mentioned tutorials.
Furthermore, during the post-production phase of this unit I combined the audio I had created alongside this animation using Adobe Premiere Pro, as I have used this software previously to create videos related to previous work it was a simple task of syncing the audio up with the video of the animation that I had exported from After Effects making sure that none of the audio goes unused and is the correct level so not to be unheard or too loud. Additionally, once I had exported my animation with the finished visual effects and audio I had discovered that I didn’t change to text within my animation, but due to time restraints, I was unable to edit this as I did not have the time required to make these changes.
Problem-solving
Reflecting on the Audio area of production for my project, areas I wish to improve upon are my abilities to produce a more detailed audio track, in which to achieve this I will be using BandLabs program to help produce future project assets along with other similar software. Another area I wish to improve on is by using more Foley created audio in order to enhance my future projects with my own sound effects. Other paths I wish to pursue in this area are using multiple tools to create Foley sounds and also by using other types of audio software to better enhance my captured sounds.
I faced multiple issues when trying to create my character within Mudbox, as at first I struggled to mould my character into shape which I was able to later achieve my desired look once I had experimented some more with the software, another issue I faced was that the graphics tablet I was using was not working correctly with the Mudbox software which later I was able to fix by deleting the application profile from within the tablets options, this caused a tremendous amount of time lost due to the stress of not being able to fix this issue originally.
During my time working on this area of development within this project involved many hours of designing, scrapping and re-evaluating my work until I had created a suitable base for my animation to begin taking shape and as such I was left with very little time to begin on the post-production element of this assignment. Being behind on this compared to my peers’ progress on this project started to set in after I took some time off during the holidays to recharge and focus on spending time with my friends and family which was well needed. As such, with the start of a new year, I had set myself a goal to complete my animation on time with most of my ideas, concepts and current work being put to into the final piece.
Final Product
In terms of the media processes and skills that I have developed during this unit from the start of this half term to now is greater than I have initially expected of myself as I had very little to no experience with creating concept characters, animations and 3D modelling as compared to now where I understand the processes one must go through in order to create these projects, such as performing the necessary research to better understand what direction to head, realising a vision and adapting to it based on my own skillset, creating storyboards to give structure to my work and being able to understand how to use the multiple programs associated with creating an animation.
Overall, I feel like I have made a good animation aside from the end of my animation in which I didn’t really know how to end it so I used the Tv effect to end it.
In conclusion, I really enjoyed this unit and I wish to develop my skills further in regards 3D modelling, audio creation and I can’t wait to explore more into the world of games development.